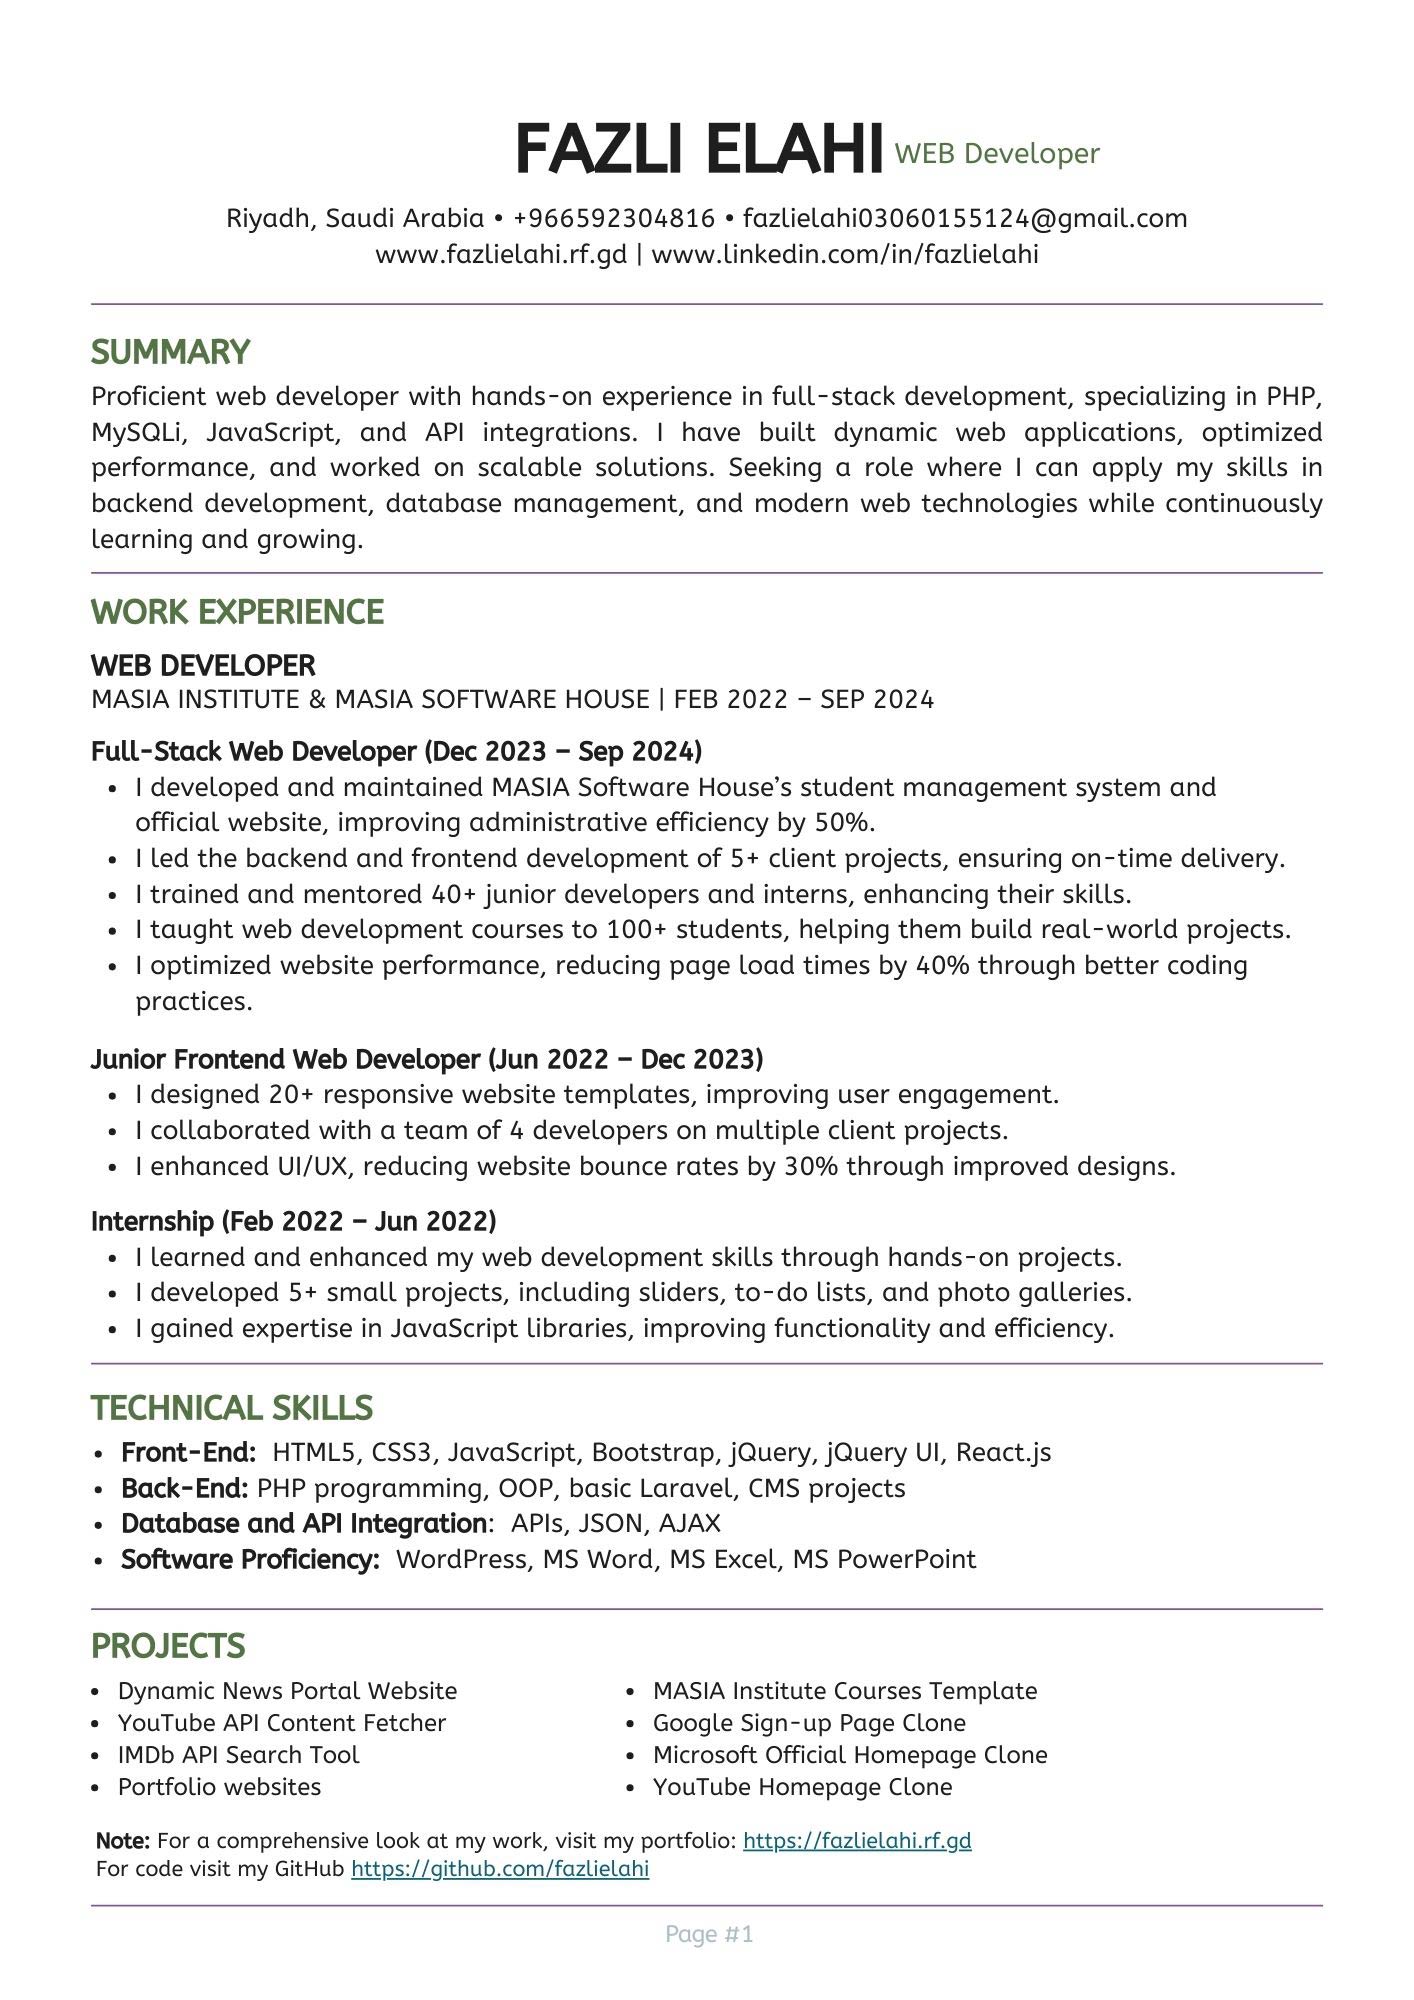

How to Build a Responsive Website from Scratch: A Beginner’s Step-by-Step Guide

Sofia
Introduction
In today’s multi-device world, a responsive website is no longer optional, it’s essential. Whether your visitors are on phones, tablets, or desktops, your site must look great and function flawlessly. In this guide, you’ll learn everything you need to create a fully responsive website from the ground up, even if you’ve never written a line of code before.
Tools You’ll Need
-
Code Editor: Visual Studio Code (free)
-
Browser: Google Chrome (with DevTools)
-
Live Server Extension: For instant preview
-
(Optional) Git & GitHub Account: To version-control and host
1. Project Setup
Create a Folder Structure
my-responsive-site
├── index.html
├── css/
└── styles.css
├── assets/
└── images/
-
Open in VS Code and install the Live Server extension for real-time updates.
2. Building the HTML Skeleton
<!DOCTYPE html> <html lang="en"> <head> <!-- Character encoding for the document --> <meta charset="UTF-8" /> <!-- Makes the site responsive on all devices --> <meta name="viewport" content="width=device-width, initial-scale=1.0" /> <!-- Page title shown in browser tab --> <title>My Responsive Site</title> <!-- Link to external CSS file --> <link rel="stylesheet" href="css/styles.css" /> </head> <body> <!-- Header section with site title and navigation --> <header> <h1>Welcome to My Site</h1> <nav> <ul> <!-- Navigation links --> <li><a href="#">Home</a></li> <li><a href="#">About</a></li> <li><a href="#">Contact</a></li> </ul> </nav> </header> <!-- Main content area --> <main> <!-- Hero section with a heading and short description --> <section class="hero"> <h2>Your Journey Starts Here</h2> <p>Learn to build websites that adapt to any screen.</p> </section> </main> <!-- Footer section --> <footer> <p>© 2025 My Responsive Site</p> </footer> </body> </html>
3. Adding Base CSS
In css/styles.css:
/* Reset and base styles */
* {
margin: 0;
padding: 0;
box-sizing: border-box;
}
body {
font-family: Arial, sans-serif;
line-height: 1.6;
color: #333;
padding: 20px;
}
header,
main,
footer {
max-width: 1000px;
margin: auto;
}
4. Styling the Navigation
nav ul {
display: flex;
list-style: none;
justify-content: center;
gap: 20px;
margin: 10px 0;
}
nav a {
text-decoration: none;
color: #007acc;
}
5. Creating the Hero Section
.hero {
text-align: center;
padding: 60px 20px;
background: #f4f4f4;
margin-bottom: 40px;
}
.hero h2 {
font-size: 2.5rem;
margin-bottom: 10px;
}
.hero p {
font-size: 1.2rem;
}
6. Making It Responsive with Media Queries
/* Mobile-first: defaults above cover phones */
/* Tablets and up */
@media (min-width: 600px) {
.hero {
padding: 80px 40px;
}
}
/* Desktops and up */
@media (min-width: 900px) {
nav ul {
justify-content: flex-start;
}
.hero {
display: flex;
align-items: center;
justify-content: space-between;
}
.hero h2 {
font-size: 3rem;
}
}
7. Testing and Iterating
-
Use Chrome DevTools: Toggle device toolbar (Ctrl+Shift+M) to preview multiple screen sizes.
-
Adjust Breakpoints: Tweak your
min-widthvalues based on your design needs. -
Optimize Images: Ensure they scale and don’t blow up mobile data.
8. Bonus Tips
-
Mobile-First Design: Start styling for small screens, then scale up.
-
Flexbox & Grid: Use modern layout modules for cleaner, more flexible designs.
-
Free Hosting: Deploy on GitHub Pages or Netlify in minutes.
Conclusion
Congratulations! you’ve built a responsive website from scratch! You now have a solid foundation in HTML, CSS, and media queries. Next up: adding interactivity with JavaScript or exploring a framework like Bootstrap or Tailwind CSS.
Call to Action
If you found this guide helpful, Subscribe to our newsletter for more tutorials.
Have questions or run into issues? Drop a comment below, and I’ll help you out!


Comments